A photography studio should organize files by client, project, shoot date, and production stage. RAW originals should remain separate from internal selects, client proofs, retouched versions, approved masters, delivery exports, and archived files. Every image set needs clear naming, metadata, project links, approval records, revision history, quality review, and a record of what the client received.
Photography studios rarely lose control of files because they lack folders.
The problem starts when several people use different folder names, ratings, file labels, and delivery methods. RAW files remain on an unmarked drive. A client sends selected filenames through email. The retoucher downloads an older selection. Two folders both contain images labelled final, yet nobody can confirm which set received approval.
That confusion grows quickly when your studio handles several photographers, clients, retouchers, and overlapping projects.
StudioHero gives photography teams a structured way to connect image records with clients, projects, metadata, QC notes, approvals, movement history, and final delivery. Our photography studio management software helps your team keep the file workflow attached to the production instead of leaving important decisions inside personal editing catalogs and message threads.
A working file system should answer:
- Which client and project does this image belong to?
- Is it an original capture, a proof, a working edit, or an approved final?
- Who needs to review it next?
- Which version received approval?
- What did the client receive?
- Where does the completed project live?
File Organization and Backup Solve Different Problems
Backup protects files against loss.
Organization tells your team what each file is, where it came from, what stage it has reached, and what should happen next.
A studio can keep several copies of the same folder and still have a poor file workflow. If nobody knows which version the client approved, extra copies won’t solve the problem.
Your storage and backup policy should protect the files according to your own technical requirements. The operational workflow should control identity, status, access, approvals, delivery, and archive location.
Both matter, but they perform different jobs.
Start With the Photography Project Record
File organization should begin before the team imports a single image.
Create or confirm the project record that will identify every image set associated with the shoot. This record should include:
- Client name
- Project or campaign name
- Project code
- Shoot date
- Photographer
- Digital tech
- Producer
- Editor or retoucher
- Client review contact
- Delivery deadline
- Required deliverables
- Image usage notes where supplied
The project record gives the files their operating context.
A folder called Product Shoot March may make sense to the photographer who created it. Six months later, another team member may not know the client, campaign, delivery status, or whether the folder contains originals or approved exports.
Connecting the files to production management software gives your team a clear relationship between the images, project tasks, responsible people, deadlines, and required deliverables.
Stage 1: Ingest and Register the RAW Files
The first controlled handoff happens when files move from the camera media into the studio’s working storage.
Record:
- Project
- Shoot date
- Source card or drive
- Photographer or camera where needed
- RAW file count
- Ingest location
- Person completing the ingest
- Verification status
- Backup status under your studio policy
The team should confirm that the expected files arrived before clearing or reusing the source media. Your own storage and backup process should decide how verification happens and how many copies are required.
The ingest record matters because file problems often appear later. If the studio expected images from three cards but registered only two, the team needs to know before culling starts.
Do not leave the only project reference inside the original camera filenames. Link the RAW set to the client and project as soon as it enters the studio workflow.
Stage 2: Use a Repeatable Folder Structure
A folder structure should show where a file sits in the production process.
One practical structure may include:
Client
Project
Shoot Date
RAW Originals
Internal Selects
Client Proofs
Retouching
Approved Masters
Delivery Exports
Project Documents
This is not the only valid structure. Your studio may separate campaigns, shoot days, product groups, photographers, or markets differently.
The operating rule matters more than the exact folder names: each stage should have one clear purpose.
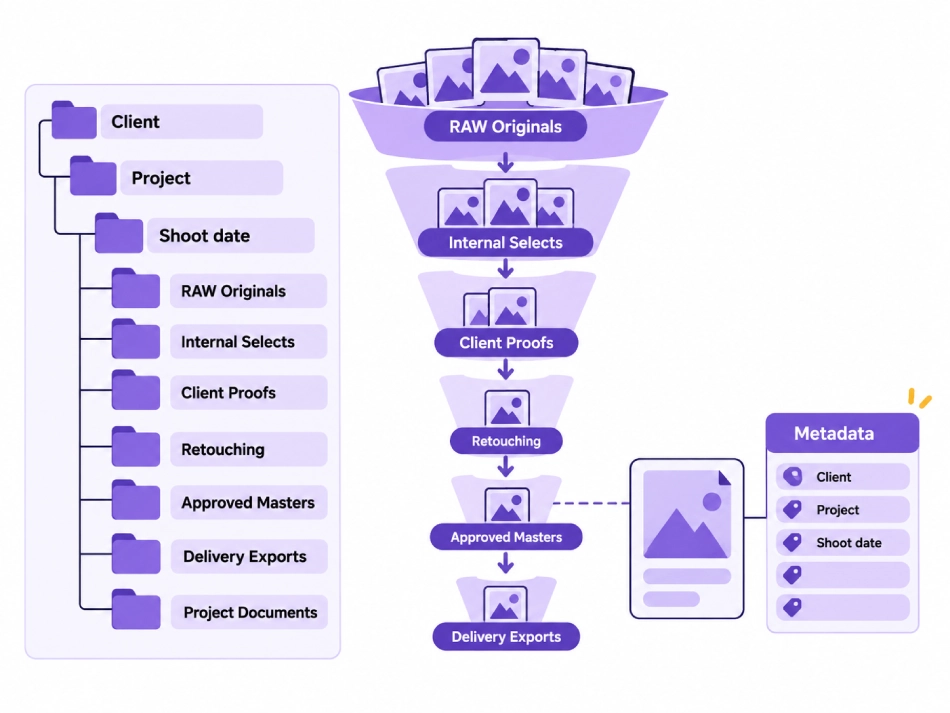
RAW Originals should contain the captured source files.
Internal Selects should contain or reference images that passed your team’s first review.
Client Proofs should contain the set prepared for client selection.
Retouching should hold working files and revision versions.
Approved Masters should contain the accepted high quality results.
Delivery Exports should contain files prepared for a defined client use.
Do not mix these stages inside one folder and rely on filenames alone to explain the difference.
Stage 3: Apply a Consistent File Naming Rule
A useful filename helps a team member identify the project and image without opening the file.
Your naming rule may include:
- Client code
- Project code
- Shoot date
- Image sequence
- File stage
- Version
- Delivery purpose
A final export for an ecommerce site may need a different identifier from the approved master used to create it.
Keep the naming rule short enough for staff to follow. Long filenames become difficult to read, and people start making their own abbreviations.
The same term should mean the same thing across the studio. If FINAL means approved for delivery, nobody should use it for an early retouching draft.
Avoid renaming RAW originals without checking how your editing, catalog, and storage workflow handles linked files. Renaming after editing work has started may break those relationships.
Stage 4: Add Searchable Metadata
Folders and filenames help when the team already knows where to look. Metadata helps people find images across projects, clients, campaigns, and archives.
Useful photography metadata may include:
- Client
- Project
- Campaign
- Shoot date
- Photographer
- Shoot type
- Product category
- Talent
- Location
- Image status
- Approval status
- Usage type
- Delivery format
- Relevant content keywords
- Storage location
Use controlled terms.
If one person enters Product, another enters Products, and a third enters Product Photography for the same category, search results become unreliable.
Create a short naming guide for repeated clients, campaign types, shoot categories, and image statuses. Your team should be able to apply it without guessing.
StudioHero’s media asset management software connects media records with searchable metadata, keywords, projects, clients, formats, QC information, and movement history.
Stage 5: Keep Each Image Stage Separate
Photography files change purpose as they move through production.
RAW Originals
The complete captured source set retained according to your studio policy.
Internal Selects
Images chosen by the photographer, producer, editor, or creative lead for further review.
Client Proofs
Review copies prepared for client selection, comments, or approval.
Retouched Files
Working images receiving corrections, finishing, crop changes, or requested revisions.
Approved Masters
The accepted master versions kept by the studio.
Delivery Exports
Files prepared for a specific use, size, format, color profile, or channel.
The client should never need to guess whether a file is a proof or an approved deliverable.
Your team should also know which stage allows changes. A client proof may still receive selection comments. An approved master should not be overwritten casually when creating a smaller web export.
Stage 6: Complete Internal Culling Before Client Review
The studio should review the captured set before giving the client access to proofs.
This stage removes clear test frames, unwanted duplicates, accidental captures, technical failures, and images that should not move into the client review set.
The artistic criteria will depend on the photographer, project brief, and client requirements. The operating process should still define:
- Who owns the first review
- Which rating or status marks a select
- Where the select decision is recorded
- Who approves the proof set
- How rejected files stay out of later stages
A file should not appear in the client proof set simply because it sits near a selected image in the folder.
Record the image identifiers that passed internal review. That selection record will later connect the proof, retouching, and delivery stages.
Stage 7: Create a Controlled Client Proof Set
The proof set should contain only the images approved for client review.
Each proof needs a clear identifier that the client can reference without describing the image as “the third one in the second row.”
The review set should also state:
- What the client is reviewing
- How many selections they can make where applicable
- Where comments should be added
- Who has approval authority
- When the selection is due
- What happens after approval
Keep the proof set separate from RAW originals and working retouching files.
Proofs exist to support a decision. They are not the final delivery.
Stage 8: Record Client Selects and Comments
Client selections should not remain scattered across screenshots, spreadsheets, email messages, and chat replies.
For every selected image, record:
- Image identifier
- Selected or rejected status
- Client comment
- Requested crop
- Retouching note
- Intended use where relevant
- Reviewer
- Approval date
- Required next action
One image may need color correction. Another may need a different crop for a campaign placement. A third may be selected as delivered with no detailed retouching.
Those instructions should remain attached to the correct image record.
A defined approval workflow helps the studio control who reviews an asset, what decision is required, and when the work can move forward.
Stage 9: Control Retouching Versions
Files named final, final new, final revised, and final latest create uncertainty.
Use a version system that identifies:
- Original image reference
- Version number
- Retoucher
- Date changed
- Revision notes
- Review status
- Approved version
- Replaced version
Keep the current approved result easy to identify, but do not erase the revision history without following your studio’s retention policy.
Version control becomes more important when several people work on the same image set. A retoucher may upload a revision while the producer is still reviewing the previous version. Without clear status, the client may receive the wrong file.
Each revision should answer what changed and whether it has been approved.
Stage 10: Complete Quality Review Before Delivery
Quality review should compare the final image with the client brief and the agreed delivery requirements.
Check:
- Correct image selection
- Retouching instructions completed
- Product color or skin tone review
- Crop requirements
- Dust, marks, or unwanted objects
- File dimensions
- Resolution
- File format
- Color profile
- Filename
- Required output versions
- Approval status
- Delivery destination
There is no universal technical specification for every photography project.
Commercial print work, ecommerce images, corporate headshots, social content, and editorial campaigns may require different dimensions, formats, profiles, crops, and naming rules.
Record the QC result rather than relying on someone remembering that they checked the folder.
StudioHero supports QC notes, issue records, corrective actions, and review information within the media record.
Stage 11: Separate Approved Masters From Delivery Exports
An approved master and a delivery export are not always the same file.
Approved Master
The accepted high quality result retained by the studio and used to create later outputs.
Delivery Export
A version prepared for a defined purpose, such as print, ecommerce, website use, press, social media, or a client archive.
One approved master may create several delivery exports.
For example, the same image may need:
- A print file
- A website file
- A square social crop
- An ecommerce background version
- A press ready file
Each export should remain connected to the approved master so the team can trace where it came from.
Do not overwrite the master when creating smaller or differently cropped files.
Stage 12: Record What the Client Received
Final delivery should create a record.
Capture:
- Client
- Recipient
- Project
- Delivered image set
- File versions
- Formats
- Delivery date
- Delivery location or method
- Person completing the delivery
- Client access or confirmation where recorded
A completed project should allow your team to answer:
Which files did we send?
Which versions were included?
Who received them?
When were they delivered?
The delivery record protects the studio from relying on old email threads or temporary transfer links.
StudioHero records media movement, access, project links, and delivery activity so your team can trace the final handoff.
Stage 13: Move Completed Work Into the Archive
Active production files and archived project files serve different purposes.
Active files support ongoing selection, retouching, review, and delivery. Archived files preserve the finished project according to your studio’s retention and storage policy.
The archive record may include:
- Retained RAW originals
- Internal selection records
- Approved masters
- Delivery exports
- Client comments
- Approval records
- QC records
- Delivery history
- Project documents
- Archive location
- Access level
- Retention details
Archived work should remain searchable by client, project, campaign, date, photographer, format, and relevant keywords.
A folder moved to an external drive is not fully archived if nobody updates the recorded location.
Control Access at Every File Stage
Not every person needs the same access.
Your workflow may include:
- Photographer
- Digital tech
- Producer
- Editor
- Retoucher
- Studio manager
- Client reviewer
- Archive manager
RAW originals may require limited editing or deletion access. Retouchers need working access to selected files. Clients should see only the proof or delivery sets intended for them.
Permissions should follow the role and file stage.
This reduces accidental changes, unapproved deletion, and client access to internal working material.
Media management is one of the core functions of studio management because it connects production work with people, projects, storage, review, and client delivery.
Photography File Organization Workflow
Project Setup
Contains: Client, project code, shoot date, crew, deadline, and required deliverables.
Responsible role: Producer or studio coordinator.
Complete when: The project record contains the information needed to identify the incoming image set.
RAW Ingest
Contains: Camera originals copied from the source media.
Responsible role: Digital tech, photographer, or assigned ingest operator.
Complete when: The expected files have been registered and verified under the studio’s process.
Folder Placement
Contains: RAW files placed under the correct client, project, shoot date, and file stage.
Responsible role: Ingest operator.
Complete when: The project path and recorded storage location match.
Metadata Assignment
Contains: Client, project, date, photographer, category, status, and search terms.
Responsible role: Media coordinator or assigned team member.
Complete when: The image set can be found without relying only on its folder location.
Internal Culling
Contains: Ratings, rejected frames, and internal selection decisions.
Responsible role: Photographer, editor, producer, or creative lead.
Complete when: The proof set has an approved list of image identifiers.
Client Proof Set
Contains: Review copies and clear file identifiers.
Responsible role: Producer or client service contact.
Complete when: The client receives the approved review set and instructions.
Client Selection
Contains: Selected images, comments, crop requests, and retouching notes.
Responsible role: Client reviewer and assigned producer.
Complete when: Every decision has been recorded against the correct image.
Retouching
Contains: Working versions and revision notes.
Responsible role: Retoucher or editor.
Complete when: The requested work has passed internal review.
Final Approval
Contains: The version accepted for master and export creation.
Responsible role: Authorized studio and client reviewers.
Complete when: One approved version is clearly identified.
Quality Review
Contains: QC status, corrections, technical checks, and delivery requirements.
Responsible role: Assigned reviewer.
Complete when: The file meets the approved brief and delivery specification.
Delivery Export
Contains: Files created for the agreed formats, sizes, crops, and uses.
Responsible role: Editor, retoucher, or delivery coordinator.
Complete when: Every export remains connected to the approved master.
Client Delivery
Contains: Delivered files, versions, recipients, date, and delivery record.
Responsible role: Producer or client service contact.
Complete when: The final handoff has been recorded.
Archive
Contains: Retained originals, approvals, masters, exports, records, and project documents.
Responsible role: Media or archive manager.
Complete when: The files and their recorded archive location match.
Photography Media Naming and Metadata Record
Client
Use the approved client or company name. This keeps projects grouped under one identity.
Project
Use the project, campaign, catalog, or production name recognized by the team.
Project Code
Use the internal identifier assigned to the work.
Shoot Date
Record the actual capture date, not only the delivery date.
Photographer
Identify the person responsible for capture where several photographers work on the project.
Asset Stage
Use a controlled status such as RAW Original, Internal Select, Client Proof, Retouching, Approved Master, or Delivery Export.
Image Identifier
Keep one reliable identifier attached to the image throughout selection, retouching, and delivery.
Version
Record the working or approved version number.
Approval Status
State whether the file is pending review, approved, rejected, or replaced.
Usage Type
Record the planned use where it affects output requirements.
Delivery Format
Record the required file format, size, resolution, crop, or profile.
Storage Location
Record where the active or archived file currently resides.
How StudioHero Supports Photography Media Organization
StudioHero gives photography studios a central media library connected to client and project records.
Your team can organize and find media through:
- Client and project links
- Search by title, barcode, format, and metadata
- Keyword tagging
- Standard categories
- Physical and digital media records
- QC notes
- Issue and corrective action records
- Supporting files
- Movement history
- Authorized checkouts
- Package and batch records
- Usage history
- Delivery tracking
- Archive locations
StudioHero does not replace your editing software. It gives the wider studio team a record of what the media is, which project it supports, what stage it has reached, and what happened after capture.
Organize Every File Around Its Next Decision
A photography file system should tell your team more than where an image is stored.
It should show what the image is, where it came from, which stage it has reached, who needs to act next, which version received approval, and what the client received.
Folders help contain the files. They cannot record every selection, revision, QC decision, approval, delivery, and archive movement on their own.
StudioHero connects photography media with projects, metadata, review notes, versions, delivery records, and archive locations so your team can follow each image set through its full working life.
Book a StudioHero demo to see how your studio can organize photography media, project records, QC notes, approvals, final delivery, and archive activity in one system.