A standardized photography location kit is a documented equipment package built for a repeatable type of shoot. Each kit should have a fixed core list, optional modules, asset identifiers, a storage location, an assigned owner, checkout records, return checks, and replenishment rules. Your team can adapt the kit for each project, but every addition or removal should be recorded.
A location kit should not depend on which photographer or assistant packed it.
When every crew member builds a kit differently, the same problems keep returning. Chargers stay behind. Tethering cables end up in another case. Batteries come back uncharged. One team carries too much gear, while another arrives without the small adapter that makes the whole setup work.
Standardized kits give photography teams a repeatable starting point.
StudioHero helps studios organize equipment records, kits, storage locations, project assignments, barcodes, checkouts, returns, maintenance, and inventory quantities. Our photography studio management software keeps each location kit tied to the shoot, the assigned team, and the assets packed inside it.
Standardization does not mean every project receives the same equipment. It means your team starts with an approved base kit, then adds only what the brief, location, lighting plan, power supply, and expected image output require.
Build the Kit Around a Repeatable Type of Work
Do not begin by asking how much equipment fits inside a case.
Start with the job the kit must support.
A photography studio may need different base kits for:
- Corporate headshots
- Environmental portraits
- Product photography
- Fashion editorials
- Ecommerce shoots
- Food photography
- Event coverage
- Tethered commercial work
- Small location studio setups
- Documentary style assignments
Each type of work has a different pattern.
A corporate headshot kit may need a compact camera setup, portrait lenses, portable lighting, a neutral background, a laptop, and basic grip. A product photography kit may need tethering, a color accurate display, tabletop surfaces, macro options, clamps, and cleaning supplies.
Trying to combine every use case into one universal location kit creates a heavy package that takes longer to inspect and still may not suit the shoot.
Define one clear purpose for each kit. The name should tell your team what kind of work it supports.
Separate Core Equipment From Optional Modules
The core kit should include the equipment needed for nearly every shoot in that category.
Optional modules should handle requirements that appear only on certain projects.
A location kit structure may include:
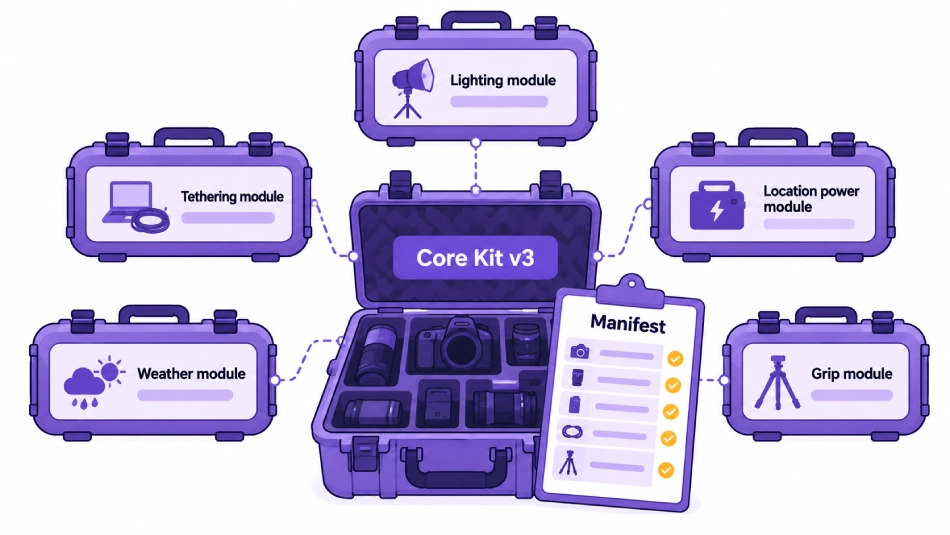
Core Camera Kit
Camera bodies, standard lenses, batteries, chargers, memory cards, straps, caps, cleaning items, and protective cases.
Lighting Module
Lighting units, stands, modifiers, triggers, receivers, power cables, batteries, sandbags, and cases.
Tethering Module
Laptop, power supply, tethering cables, cable support, card reader, storage drive, monitor connection, and adapters.
Location Power Module
Extension cables, power strips, plug adapters, portable power, cable protection, and labels.
Weather Protection Module
Equipment covers, sealed pouches, dry cloths, protective wraps, and case covers.
Grip Module
Tripods, plates, clamps, support arms, grip heads, stands, safety cables, and basic tools.
This structure lets the team reserve the base kit, then add the modules required for the project.
A shoot that uses available light may not need the full lighting module. A product job with live client review may need the tethering module and extra storage. The base kit remains stable while the project setup changes.
Build the Core Contents List From Real Shoot History
Do not fill the kit with equipment simply because the studio owns it.
Review actual production records.
Look at:
- Equipment requested across recent shoots
- Items that crews repeatedly add at the last minute
- Parts that teams often forget
- Equipment that returns unused
- Repeated missing item reports
- Setup problems reported by photographers
- Location conditions
- Client requirements
- Backup needs
- Equipment usage records
Each core item should answer a repeated production need.
Suppose photographers add the same spare tethering cable to almost every commercial shoot. That cable may belong in the standard tethering module. If a large modifier travels on only one project every few months, it probably belongs in project specific gear rather than the permanent kit.
Keep the base package practical. A smaller complete kit is more useful than a large case filled with equipment nobody checks carefully.
Define Standard Quantities
Every repeatable item needs a normal quantity.
This applies to:
- Batteries
- Memory cards
- Tethering cables
- Adapters
- Clamps
- Sandbags
- Power cables
- Storage drives
- Cleaning supplies
- Labels and cable ties
The correct quantity depends on the kit purpose.
Consider:
- Expected shoot duration
- Equipment power use
- Crew size
- Distance from the studio
- Access to charging
- Available backup equipment
- Capture volume
- Location conditions
- Transport limits
- Time available for replacement
Do not set quantities by copying another studio’s list. A team working one hour from its equipment room can recover from a missing item more easily than a crew travelling several hours to a location.
Your standard should reflect how your own team works.
Give Every Kit a Clear Identity
A kit should be treated as a managed studio resource, not a random group of cases.
Record:
- Kit name
- Kit number
- Barcode
- Purpose
- Storage location
- Assigned owner
- Standard contents
- Optional modules
- Current condition
- Current availability
- Kit version
- Last return review
High value and serialized items should keep individual asset records even when they belong to a kit.
A camera body, lens, lighting unit, laptop, or storage drive may move between kits over time. Its own record should preserve its barcode, serial number, service history, assignments, condition, and current location.
StudioHero’s equipment tracking software supports individual equipment records, kits, barcodes, assignments, locations, usage history, and checkout activity.
Create a Kit Manifest
The kit manifest tells the person packing and receiving the case what belongs inside it.
Include:
- Item name
- Asset identifier
- Quantity
- Core or optional status
- Assigned case
- Compartment or pouch
- Condition
- Approved substitute
- Consumable minimum
- Return requirement
- Notes
The manifest should be available during preparation, checkout, use, return, and inspection.
A simple contents list is not enough when items are spread across several cases. Record where each part belongs.
For example:
| Item | Quantity | Packing Location |
| Camera body | Defined by studio | Camera case, main compartment |
| Camera batteries | Defined by studio | Camera case, battery pouch |
| Tethering cable | Defined by studio | Tethering case, labeled sleeve |
| Card reader | Defined by studio | Tethering case, accessory pocket |
| Light trigger | Defined by studio | Lighting case, control pouch |
| Sandbags | Defined by studio | Grip case |
The layout should make missing parts easy to spot.
Match the Physical Case to the Manifest
The inside of the case should follow the documented list.
Use:
- Named compartments
- Labeled pouches
- Cable sleeves
- Battery sections
- Accessory containers
- Empty space markers
- Case photos
- Simple layout diagrams
- Separate areas for charged and used batteries
- Clear labels for fragile parts
A loose pile of accessories slows both checkout and return.
When every cable, adapter, trigger, plate, and charger has a fixed place, the receiving assistant can see what is missing without emptying the entire case.
Do not make the arrangement too complicated. Staff should be able to follow it during a busy return.
Assign a Kit Owner
Each standardized kit needs one person responsible for the standard.
The kit owner should:
- Maintain the approved contents
- Review return problems
- Check consumable levels
- Approve permanent changes
- Record missing equipment
- Coordinate maintenance
- Update the manifest
- Confirm the storage location
- Review repeated project additions
- Keep kit versions consistent
The owner does not need to attend every shoot or pack every case.
Their job is to protect the standard so one team does not quietly remove an item while another adds a substitute without recording it.
StudioHero’s crew management software can connect people, roles, assignments, availability, and project work, which helps clarify who owns preparation and return tasks.
Add Project Specific Equipment Without Changing the Standard Kit
Some shoots need extra gear.
Record each addition under the project:
- Added item
- Reason
- Project
- Assigned person
- Packing location
- Expected return
- Whether the item replaces something
- Whether the change should be reviewed later
Project additions should remain separate from the core manifest.
Suppose a food photography shoot needs a specialty overhead support that does not travel with most product projects. Add it to that deployment record. Do not make it a permanent part of the kit after one use.
Repeated additions deserve review. One unusual job does not.
Track Rented and Client Supplied Equipment
External equipment still needs a record.
Rented Equipment
Record:
- Supplier
- Pickup date
- Return deadline
- Project
- Assigned crew member
- Condition
- Included parts
- Rental extension
- Packing location
- Return handoff
Client Supplied Equipment
Record:
- Owner
- Delivery date
- Project
- Storage location
- Condition where needed
- Assigned crew member
- Return contact
- Handoff date
The studio may not own these items, but it still needs to know where they are and which production uses them.
Do not add rented or client-supplied items to the permanent kit manifest unless the studio later purchases and approves them as standard assets.
Deploy the Kit Against a Project Record
Before releasing the kit:
- Confirm the project
- Confirm the location
- Confirm the current kit version
- Compare the physical contents with the manifest
- Record project specific additions
- Record rented equipment
- Record client supplied items
- Assign the kit to a crew member
- Scan the kit
- Scan individual assets where required
- Set the expected return time
- Record the destination
The full movement process belongs in Photography Equipment Checkout and Return: A Complete Tracking Workflow.
The role of the kit system is to make sure the studio knows what the standard package contains and what changed for this particular deployment.
Build a Replenishment Process
Consumables and small accessories can make a kit unusable even when every major asset returns.
Track items such as:
- Tape
- Cleaning supplies
- Cable ties
- Labels
- Protective material
- Disposable covers
- Background paper
- Gels
- Wipes
- Small batteries treated as stock
- Packaging materials
- Other production supplies
For each item, define:
- Standard quantity
- Minimum acceptable quantity
- Storage location
- Restock owner
- Reorder point
- Last replenishment date
The receiving team should update used quantities during return.
StudioHero’s inventory management software helps studios track supplies, quantities, reserved stock, storage locations, usage, and reorder needs.
Review the Kit After Every Return
The return review should capture:
- Missing components
- Used consumables
- Damaged equipment
- Equipment needing cleaning
- Items added during the shoot
- Items that were packed but not used
- Crew feedback
- Maintenance requirements
- Packing problems
- Storage issues
Do not change the kit standard after every complaint or personal preference.
A photographer may dislike one item while another relies on it. A rare production may need equipment that does not belong in the base package.
Look for repeated evidence across several deployments.
Control Changes With Kit Versions
Standard kits will change.
Record each approved change with:
- Version number
- Effective date
- Items added
- Items removed
- Quantity changes
- Reason for the change
- Person approving it
- Kits affected
- Manifest update
- Case layout update
Version control prevents two cases with the same kit name from carrying different contents.
If Kit A is updated but Kit B still follows the old list, record that difference until both have been changed. Do not assume the kit name alone explains what is inside.
Use Return Data to Improve the Kit
Review kit records over time.
Look for:
- Items that crews repeatedly add
- Equipment that rarely gets used
- Accessories that often go missing
- Consumables that run out early
- Components that fail often
- Gear that slows transport
- Equipment that does not fit the case well
- Repeated requests for different backup options
- Items placed in the wrong storage area
- Modules that travel together on most shoots
Repeated additions may belong in a new kit version.
Equipment that stays unused across many deployments may not need to remain in the core package. Removing it can reduce weight, inspection time, and transport effort.
The equipment utilization calculator can help studios compare available equipment time with actual recorded use.
Standardized Location Kit Template
| Kit Section | Core Item | Standard Quantity | Optional Module | Asset Tracking Needed | Replenishment Needed |
| Camera | Camera bodies | Defined by studio | Backup camera module | Yes | No |
| Lenses | Standard lens set | Defined by studio | Specialty lens module | Yes | No |
| Power | Camera batteries | Defined by studio | Extended power module | Yes or quantity record | Yes |
| Charging | Chargers and cables | Defined by studio | Vehicle charging module | Kit record | No |
| Media | Memory cards | Defined by studio | High capacity media module | Yes or quantity record | Conditional |
| Tethering | Laptop and tether cable | Defined by studio | Client monitor module | Yes | No |
| Storage | Project and backup drives | Defined by studio | Additional backup module | Yes | No |
| Lighting | Lighting units | Defined by studio | Expanded lighting module | Yes | No |
| Modifiers | Standard modifiers | Defined by studio | Specialty modifier module | Asset or kit record | No |
| Grip | Stands, clamps, and support | Defined by studio | Heavy grip module | Asset or kit record | No |
| Power distribution | Extensions and adapters | Defined by studio | Portable power module | Kit record | No |
| Transport | Cases and covers | Defined by studio | Freight module | Asset record | No |
| Weather protection | Covers and sealed pouches | Defined by studio | Weather module | Kit record | Conditional |
| Cleaning | Cloths and cleaning supplies | Defined by studio | None | Quantity record | Yes |
| Consumables | Tape, labels, ties, and covers | Defined by studio | Project supply module | Quantity record | Yes |
| Documentation | Manifest and case layout | One current version | None | Version record | No |
Location Kit Deployment Record
| Record Field | What to Enter | Why It Matters |
| Kit name | Approved kit name | Identifies the package |
| Kit version | Current version number | Confirms the expected contents |
| Project | Client and project name | Connects the kit to the work |
| Location | Shoot address or facility | Records where the kit is going |
| Assigned crew member | Named person | Creates clear responsibility |
| Checkout time | Actual release time | Starts the movement record |
| Expected return | Approved return time | Supports future availability |
| Added gear | Project specific items | Separates additions from the core kit |
| Rented gear | Supplier and items | Tracks external equipment |
| Client supplied gear | Owner and items | Records equipment entering the project |
| Missing items | Items not present at return | Starts follow up |
| Return condition | Condition and damage notes | Protects future bookings |
| Replenishment work | Supplies to replace | Restores the kit for reuse |
How StudioHero Supports Location Kit Management
StudioHero gives photography studios a structured way to manage reusable location packages.
Your team can record:
- Equipment assets
- Manufacturer and model details
- Serial numbers
- Barcodes
- Kits and bundles
- Storage locations
- Crew assignments
- Project assignments
- Check in and check out activity
- Availability status
- Usage records
- Maintenance history
- Inventory quantities
- Out of service equipment
The studio equipment management platform connects equipment availability, storage, maintenance, project use, and future bookings. This helps the equipment team keep the kit standard accurate while crews continue adapting each deployment to the shoot.
Standardize the Starting Point, Not Every Shoot
A standardized location kit should give your photography team a dependable starting package.
It should not force every project into the same setup.
Define the core contents, keep optional modules separate, record project additions, inspect every return, replace used stock, and change the standard only when repeated use supports the decision.
StudioHero connects each kit with its assets, storage location, project, assigned crew member, checkout, return, maintenance, and future availability.
Book a StudioHero demo to see how your studio can build, track, deploy, return, and maintain reusable photography location kits.