A photography equipment checkout and return workflow should record each asset from reservation through final storage. Your studio should confirm availability, assign the gear to a project and crew member, record its condition, scan it out, set an expected return time, scan it back in, inspect every item and accessory, then update its status to available, missing, damaged, or under maintenance. The checkout should stay open until the return has been fully reconciled.
Photography equipment tracking starts before a camera, lens, or lighting kit leaves storage.
A camera may physically leave the studio while its record still shows available. A lighting kit can return without a trigger, yet someone may close the checkout because the case came back. A damaged lens may go onto its usual shelf before the next coordinator reserves it for another shoot.
These problems happen when the equipment moves but the record does not move with it.
StudioHero helps photography teams connect equipment records, reservations, barcodes, crew assignments, project use, storage locations, condition notes, checkouts, returns, and maintenance activity. Our photography studio management software keeps equipment tied to the shoot and the people using it.
A reliable workflow should tell your team:
- What the item is
- Where it normally belongs
- Which project has reserved it
- Who currently has it
- Where it has gone
- When it should return
- What condition it was in before release
- What condition it was in after return
- Whether it can be booked again
Equipment Tracking Begins With the Asset Record
Every tracked camera body, lens, lighting unit, computer, monitor, drive, tripod, or other asset needs a permanent equipment record.
That record should contain:
- Equipment name
- Category
- Manufacturer and model
- Serial number
- Barcode
- Storage location
- Kit membership
- Current condition
- Availability status
- Maintenance history
- Purchase and warranty details where recorded
The permanent asset record is different from a checkout record.
A camera body should have one asset record throughout its working life. It may then collect dozens of reservations, checkout transactions, location changes, return records, and maintenance entries.
Without a stable asset record, your team cannot tell whether two similar camera bodies are the same unit. Generic entries such as “Camera 1” become unreliable when labels fall off, gear moves between cases, or equipment returns to the wrong shelf.
Serial numbers and barcodes remove that uncertainty. They connect the physical item to its history.
StudioHero’s equipment tracking software supports searchable equipment records with manufacturer, model, barcode, category, status, location, assignment, and service details.
Stage 1: Reserve Equipment Against the Shoot
Checkout does not begin at the equipment room door. It begins when the project requests the gear.
The reservation should identify:
- Client and project
- Shoot date
- Preparation period
- Equipment usage period
- Expected return time
- Studio room or location
- Assigned photographer
- Person responsible for the gear
- Requested individual assets
- Requested kits
- Backup equipment
- Rented equipment
- Client supplied equipment
The reservation period needs to cover more than the visible shoot time.
A location shoot may require equipment collection the previous afternoon. The crew may return after the equipment room closes. Gear may then need inspection and charging before another team can use it.
If the next booking starts before those steps can happen, the item is not truly available.
An approved reservation should change the item’s status so another coordinator cannot promise it to another shoot. This is one of the operating rules covered in How to Prevent Double Bookings in a Busy Photography Studio.
Stage 2: Check Availability and Conflicts
Before preparing the equipment, confirm that every requested item remains available for the full period.
Check whether:
- The item is currently in storage
- Another person has checked it out
- An overlapping reservation exists
- The item is waiting for inspection
- The item has been marked for repair
- The expected return conflicts with another shoot
- Every required part of the kit remains available
- A location or storage change has been recorded
A kit should not appear available when one necessary component is missing.
Suppose the studio reserves a tethering kit containing a laptop, power supply, card reader, cables, monitor adapter, and external drive. The laptop may be available, but the package cannot support the shoot if another project has the required cable.
Availability must apply to the complete working set, not only the largest item.
Stage 3: Prepare and Inspect the Equipment
Preparation confirms that the reserved asset is the correct item and is ready for release.
Your team should verify:
- Correct asset
- Correct kit
- Working condition
- Included accessories
- Existing physical marks
- Clean and usable state
- Suitable protective case
- Battery and power readiness
- Correct labels
- Ready status
The detailed camera, lens, lighting, power, media, grip, and location checks belong in the Photography Gear Checkout Checklist for Studio and Location Shoots.
Within this tracking workflow, the main requirement is that the inspection creates a recorded result. Staff should not rely on a verbal statement that the gear looked fine.
Visible marks, missing accessories, or existing faults should appear in the condition note before release. That gives the return inspector something to compare against later.
Stage 4: Assign the Gear to a Person and Project
Every equipment checkout needs one identifiable person who accepts the assignment.
Do not use vague labels such as:
- Camera department
- Photo crew
- Location team
- Production unit
Those descriptions may identify a group, but they do not show who accepted the equipment or who should respond when the return is late.
The assignment should record:
- Crew member name
- Project
- Destination
- Checkout date and time
- Expected return
- Equipment included
- Condition at release
- Staff member approving the checkout
- Notes about rented or client supplied gear
The assigned person may distribute equipment among the team after arrival, but the studio still needs a named contact for the transaction.
Weak handoffs are a common cause of missing accessories and uncertain responsibility. The guide to shared equipment tracking mistakes explains why informal transfers make equipment harder to trace.
Stage 5: Scan and Complete the Checkout
Barcode scanning links the physical equipment to the checkout transaction.
For each item or kit, the scan should:
- Identify the asset
- Connect it to the project
- Assign it to the crew member
- Record the checkout time
- Set the expected return
- Record the destination
- Change the status to checked out
- Remove it from available equipment
- Preserve condition notes
- Record who released it
Scanning should also flag equipment that is already unavailable, reserved elsewhere, or blocked for maintenance.
Studios can scan individual serialized assets, complete kits, or both. A camera body may need its own asset history, while smaller kit parts can remain under a grouped contents record.
The checkout is complete only after the physical gear, asset record, project assignment, and status all match.
Stage 6: Track the Equipment During Use
Equipment does not always remain with the same person or at the same location until return.
During active use, the team may:
- Transfer a kit to another crew member
- Move equipment between studio rooms
- Take gear from the studio to a location
- Extend the shoot
- Keep part of a kit for another day
- Return some items early
- Add more equipment during production
- Send gear directly to another shoot
These changes need updated records.
Suppose the original photographer checks out a lighting kit, then hands it to another crew member for a second day. The original record should not close simply because custody changed. Record the new holder, location, and expected return.
Direct project to project transfers require particular care. The studio must inspect or at least reconcile the gear according to its process, then update the project assignment and return deadline. Otherwise, the first transaction appears overdue while the second project has no equipment record.
Stage 7: Respond to Overdue Equipment
Once the expected return time passes, the studio needs to find out what happened.
The equipment coordinator should:
- Contact the assigned person
- Confirm whether the shoot has extended
- Record an approved new return time
- Review the next reservation
- Identify replacement equipment where needed
- Record the reason for the delay
- Update the current location
An overdue item is not only a return problem. It may affect room preparation, another project, equipment maintenance, or a client promise.
The article on equipment tracking problems creative studios face daily covers how delayed returns and missing records spread into wider studio operations.
Do not change the expected return silently. Record who approved the extension and which upcoming bookings were reviewed.
Stage 8: Scan the Equipment Back In
The return scan records that equipment has physically come back.
Capture:
- Actual return date and time
- Receiving staff member
- Returned assets
- Returned kits
- Returned quantities
- Partial return status
- Items still outstanding
- Next inspection step
Scanning a returned case should not automatically close the entire checkout.
A case can return with missing batteries, chargers, cables, triggers, plates, caps, or adapters. The transaction must remain open or incomplete until staff reconcile the contents against the original checkout.
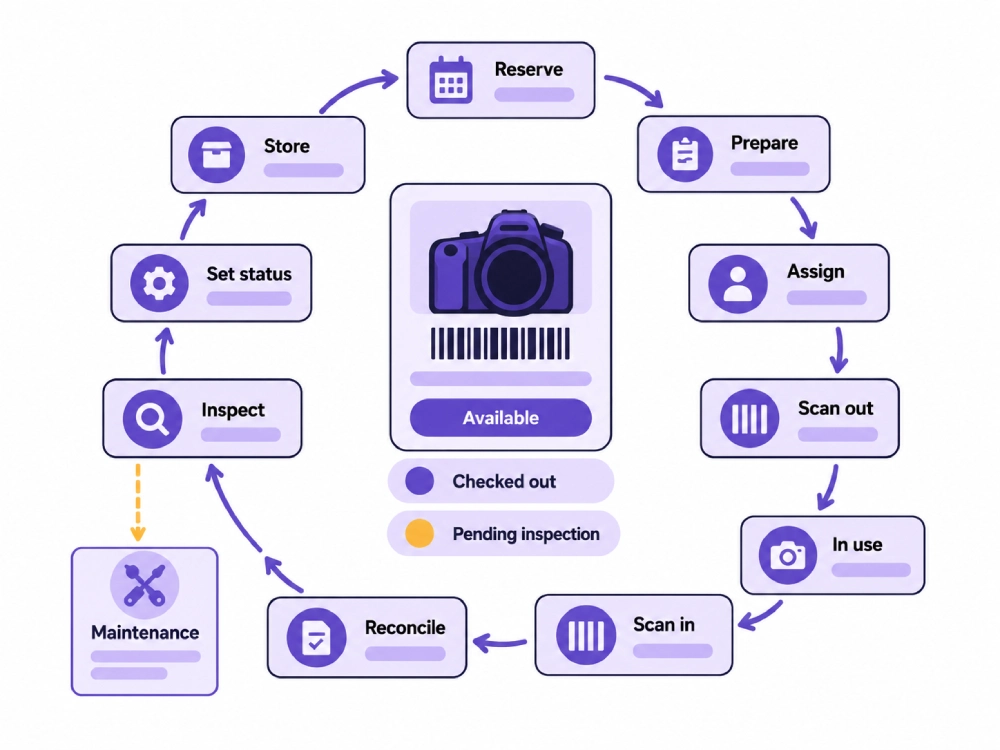
The return scan answers, “What came back?” It does not yet answer, “Is everything complete and ready for use?”
Stage 9: Reconcile the Return
Reconciliation compares the return with the original checkout record.
Check:
- Asset identity
- Item quantity
- Kit contents
- Included accessories
- Cases and protective covers
- Rented items
- Client supplied items
- Outstanding equipment
- Unrecorded substitutions
- Items returned to another room or facility
Partial returns should remain visible.
If the team returns camera bodies and lenses but keeps the lighting kit overnight, record the returned assets separately. Keep the remaining equipment assigned to the project with its current due date.
Do not close everything because the main camera case returned.
Stage 10: Inspect the Returned Equipment
After reconciliation, inspect the physical and working condition.
Check:
- New marks or damage
- Lens and camera condition
- Ports, mounts, switches, and covers
- Lighting heads and power units
- Tripods, stands, and grip parts
- Batteries and chargers
- Cards, drives, and tethering equipment
- Missing accessories
- Cleaning needs
- Functional problems reported by the crew
- Media still attached to the project
- Case condition
Compare the result with the condition recorded before checkout.
If a crew member reports an equipment problem during the shoot, add that note even when no visible damage appears. The item may need testing before anyone uses it again.
The return inspection should happen before the asset becomes available for another reservation.
Stage 11: Set the Correct Equipment Status
After inspection, each asset needs an accurate status.
Possible statuses include:
- Available
- Cleaning required
- Inspection required
- Missing accessory
- Partially returned
- Damaged
- Repair required
- Out of service
- Missing
- Awaiting return
Do not mark equipment available simply because it has returned to the building.
A camera sitting on the inspection table is not ready for another project. A lighting kit missing its trigger is not a complete available kit. A lens with a damaged mount should not appear in search results as bookable.
This is where equipment checkout connects with studio equipment management. Availability, maintenance, project schedules, and future reservations all depend on the return status.
Stage 12: Open Maintenance or Follow Up Work
Equipment needing attention should move into a separate follow up record.
Record:
- Asset
- Reported issue
- Related checkout
- Related project
- Condition notes
- Photographs where your process requires them
- Assigned person
- Required action
- Current status
- Next review date
The maintenance history should remain attached to the permanent equipment record. Over time, this gives the studio a record of recurring faults, service frequency, and equipment downtime.
The guide to equipment management, tracking, and maintenance explains how equipment movement and service records work together across the asset lifecycle.
Stage 13: Return Usable Gear to the Correct Storage Location
Once an item has passed inspection, return it to its assigned location.
The location record may include:
- Facility
- Room
- Equipment area
- Cabinet
- Shelf
- Case
- Kit
Studios with similar equipment need precise location records. “Equipment room” may not be enough when staff must search several cabinets and cases before a shoot.
The physical location and the recorded location must match. Otherwise, the next coordinator may believe the item is missing or reserve a different asset unnecessarily.
StudioHero’s inventory management software supports organized records for equipment, storage, expendables, quantities, warranties, and asset information.
Stage 14: Close the Checkout Transaction
The return time alone should not close the transaction.
Close it only after:
- Every asset has returned
- Every accessory has been counted
- Partial returns have been resolved
- Condition has been recorded
- Missing items have assigned follow up
- Damaged gear has the correct status
- Maintenance work has been opened where needed
- Usable equipment has returned to storage
- Current availability is accurate
- The movement record is complete
A closed checkout should mean that your team can look at the system and trust the current status of every item involved.
Handling Partial Returns
Partial returns need item level tracking.
Suppose a location crew returns:
- Two camera bodies
- Three lenses
- The tethering kit
The crew keeps the lighting kit and grip package for another day.
Your team should:
- Scan the returned assets
- Record their return times
- Inspect their condition
- Update their status
- Keep the remaining gear checked out
- Confirm the new return time
- Review future reservations
- Leave the overall transaction partially open
Closing the entire transaction would make the remaining equipment appear available even though it is still in use.
Handling Missing Equipment or Accessories
A missing item may be a complete asset or one part of a larger kit.
Record:
- Missing item
- Barcode or serial number where available
- Checkout transaction
- Project
- Assigned person
- Last known location
- Date reported
- Person responsible for follow up
- Current availability status
- Affected future bookings
Before marking an item permanently missing, check studio rooms, cases, vehicles, loading areas, location storage, and any unrecorded crew handoff.
Keep the item unavailable during the search.
Handling Damaged Returns
When equipment returns damaged:
- Record the condition
- Link it to the checkout
- Identify who reported it
- Add photographs where used
- Mark the asset unavailable
- Assign inspection or repair
- Review upcoming bookings
- Find replacement gear where required
- Update the maintenance record
- Keep the checkout linked to the issue
This workflow should record what happened operationally. Legal responsibility, insurance coverage, and client charges belong to the studio’s separate policies.
Owned, Rented, and Client Supplied Equipment
Not every tracked item belongs to the studio.
Owned Equipment
Track the full history, including reservations, checkouts, assignments, condition, maintenance, storage, and usage.
Rented Equipment
Record the rental supplier, pickup time, project, crew assignment, rental return deadline, condition, included parts, and any approved extension.
The supplier deadline may be earlier than the studio’s internal project close time, so both dates need attention.
Client Supplied Equipment
Record what entered the studio, who delivered it, which project it belongs to, where it is stored, and when it leaves.
Client supplied gear should not disappear from the project record simply because it is not part of the studio’s owned inventory.
Photography Equipment Checkout and Return Workflow
| Workflow Stage | Required Record | Status Change | Responsible Role | Workflow Cannot Continue Until |
| Asset creation | Asset name, serial number, barcode, location, condition | New asset becomes available | Equipment manager | The item can be identified and located |
| Reservation | Project, usage period, crew member, equipment list | Available to reserved | Booking or equipment coordinator | The project and required period are known |
| Conflict check | Current assignments, reservations, maintenance | Reserved or conflict found | Equipment coordinator | Every required item is available |
| Preparation | Condition, accessories, kit contents | Reserved to prepared | Equipment assistant | The equipment is complete and usable |
| Assignment | Person, project, destination, due time | Prepared to assigned | Equipment coordinator | One person accepts the equipment |
| Checkout scan | Assets, kits, timestamp, condition | Assigned to checked out | Releasing staff member | Every item has been scanned and recorded |
| Active use | Current holder, location, due time | Checked out or transferred | Assigned crew member | Changes have been reported |
| Extension | New due time, approval, future conflict check | Due date updated | Coordinator | Upcoming reservations have been reviewed |
| Return scan | Returned items, timestamp, receiving person | Checked out to returned pending inspection | Receiving staff member | Returned items have been identified |
| Reconciliation | Quantity, accessories, partial return | Returned or partially returned | Equipment assistant | The return matches the checkout record |
| Condition inspection | Physical state, working state, missing parts | Pending inspection to reviewed | Equipment assistant | Each item has been checked |
| Maintenance decision | Repair, cleaning, inspection, out of service | Reviewed to maintenance status | Equipment manager | The correct follow up has been assigned |
| Storage update | Room, shelf, case, kit | Reviewed to available | Equipment assistant | The physical and recorded locations match |
| Transaction closure | Completed return and follow up records | Checkout closed | Equipment coordinator | Every item has a final status |
Use Checkout History to Improve Equipment Decisions
Accurate checkout and return records give your studio more than current location data.
Over time, the records can show:
- Which equipment receives frequent use
- Which kits often return incomplete
- Which crew members need clearer handoff procedures
- Which assets spend long periods under repair
- Which items create repeated booking conflicts
- Which equipment sees very little use
The equipment utilization calculator can help compare available equipment time with recorded usage. The result becomes more useful when the underlying reservations, checkout times, and returns are accurate.
How StudioHero Supports the Workflow
StudioHero connects the records required to manage photography equipment movement.
Your team can use:
- Central equipment records
- Manufacturer and model details
- Serial numbers
- Barcodes
- Storage locations
- Availability status
- Check in and check out activity
- Crew assignments
- Project assignments
- Equipment kits
- Usage history
- Maintenance records
- Out of service status
- Return accountability
This gives your photography studio a clear view of what is available, what is reserved, what is out, who has it, when it should return, and what needs attention afterward.
The Workflow Ends When the Record Matches the Gear
Equipment return does not finish when cases arrive at the studio.
It finishes when your team knows what returned, what remains out, which parts are missing, what changed condition, what needs service, and where every usable item now sits.
A checkout sheet can record a signature. A complete tracking workflow records the asset, project, person, location, timestamps, condition, status, and follow up.
StudioHero keeps those records connected so your team can manage current equipment movement without losing sight of the next booking.
Book a StudioHero demo to see how your studio can track photography equipment from reservation through checkout, return, inspection, maintenance, and storage.